Website Builder’s Essential: Implementing a Full-Site WordPress CDN with Cloudflare.
Many website owners use WordPress to build their sites, and typically, they deploy them on shared hosting, VPS, or even their own NAS devices (like I do). The issue with these setups is that they often suffer from limited performance or bandwidth. If the server goes down or the network has issues, the best-case scenario is slow loading times—and in the worst case, your site becomes completely inaccessible.
For anyone looking to grow their site and reach more users, this kind of instability can be a serious setback. And if you’re running a site with a large user base, downtime can translate into direct financial loss.
I’ve personally struggled with this problem for a while—my NAS just doesn’t have enough upload bandwidth. After a long search for a reliable solution, I finally found something that feels almost too good to be true (yes, it’s basically free): Cloudflare’s Page Rules and Cache Rules features!

When it comes to Cloudflare’s Page Rules and Cache Rules, many people have a hard time distinguishing between the two. Simply put, Page Rules not only allow you to configure caching rules but also enable you to set many other types of rules. On the other hand, Cache Rules are specifically for setting cache-related rules, and their caching rules take precedence over those in Page Rules.
Preparation steps:
-
Your website’s domain needs to be pointed to Cloudflare and have proxying enabled; this is a requirement.
It’s recommended to disable any caching plugins on WordPress and clear the cache.
Setting up Page Rules: With Cloudflare’s free plan, you can add up to 3 page rules per domain, which is usually enough for WordPress. If you’re using another website builder, don’t just copy these steps directly—make sure to set the rules according to your platform’s URL structure.
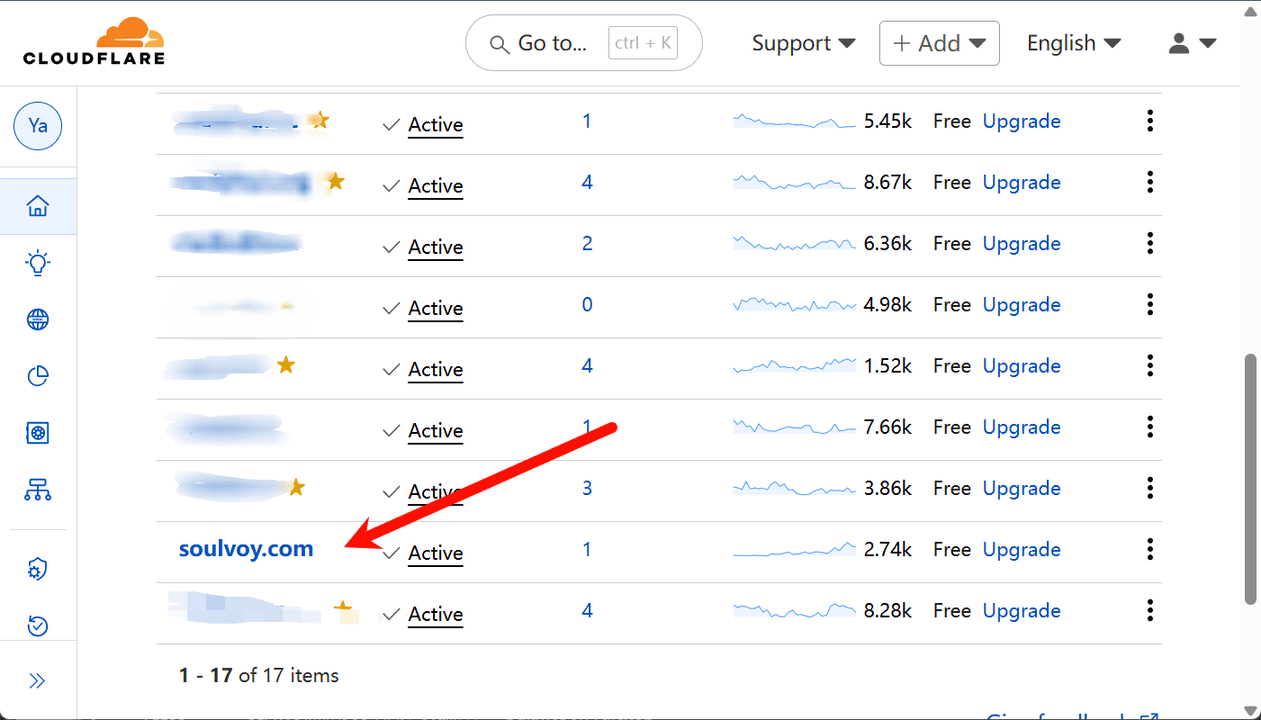
Step 1: From the Cloudflare homepage, select your domain to go to the domain settings page.
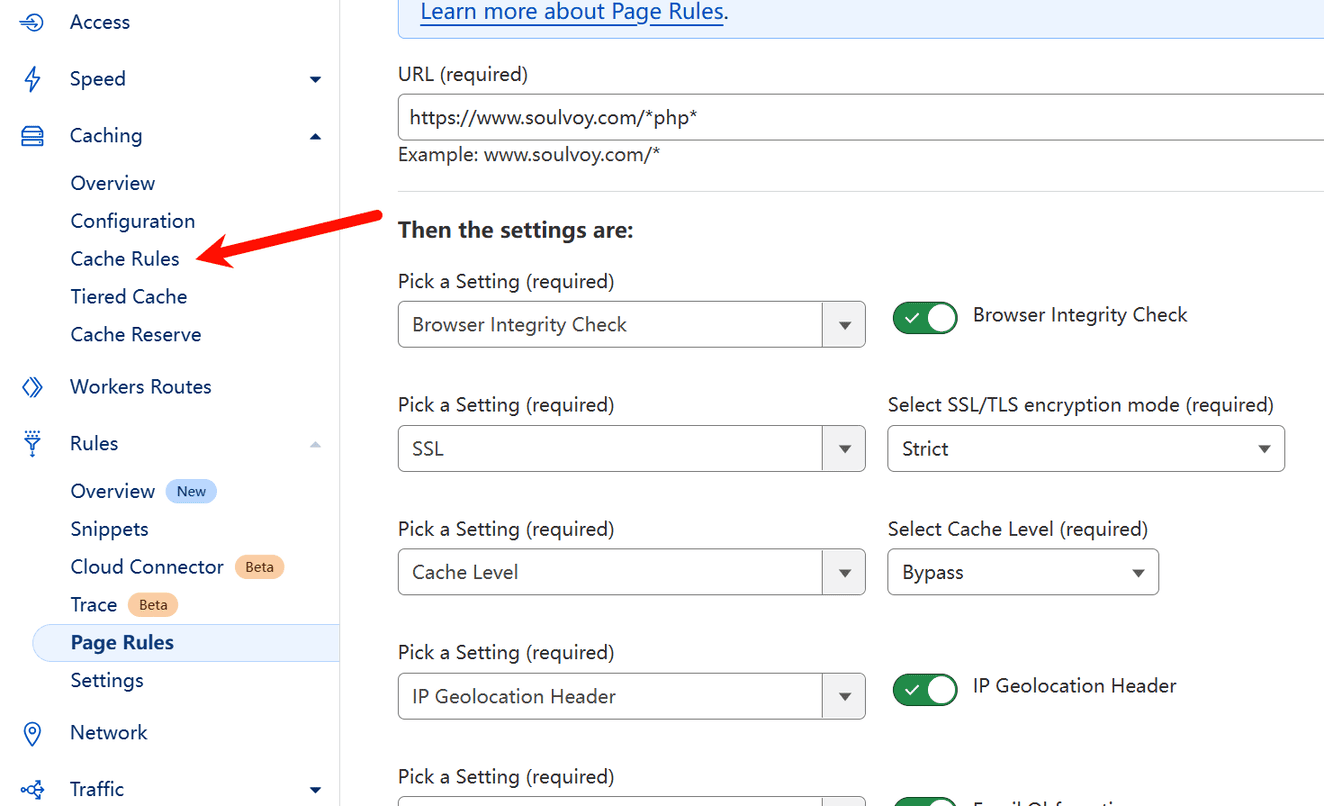
Step 2: Expand the left-hand menu and click on “Rules” — then select “Page Rules” to access the page rule settings. 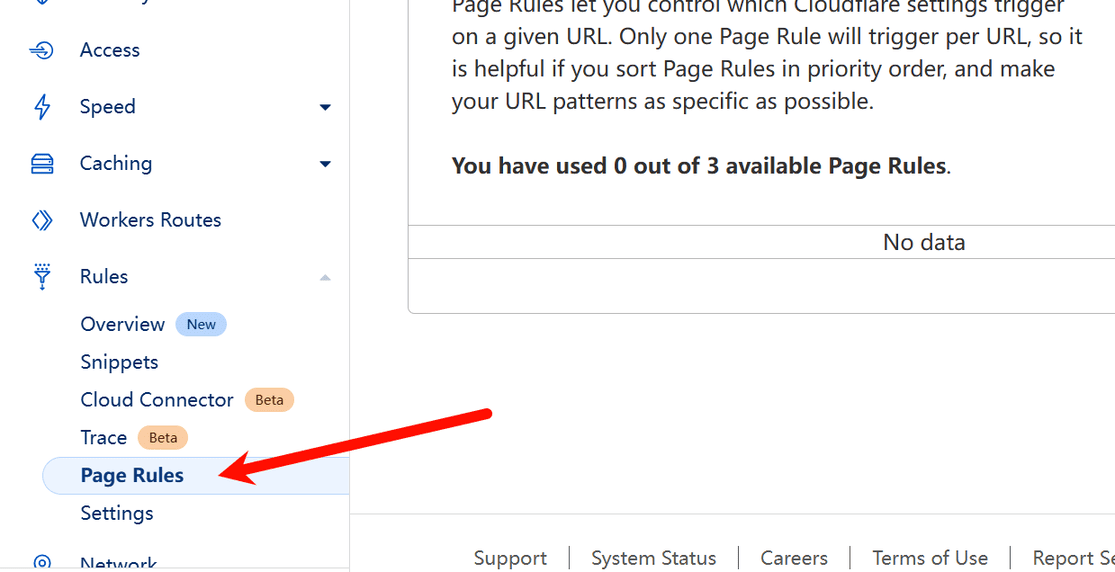
Step 3: Click the “Create Page Rule” button and add 3 rules in total, as follows:
-
Set up the admin dashboard rule.
| Rule Name | value |
|---|---|
| URL | https://www.soulvoy.com/wp-admin* ,Note: This URL should be changed to your own. |
| Browser Integrity Check | Open |
| Cache Level | Bypass |
| IP Geolocation Header | Open |
| Email Obfuscation | Open |
As shown below: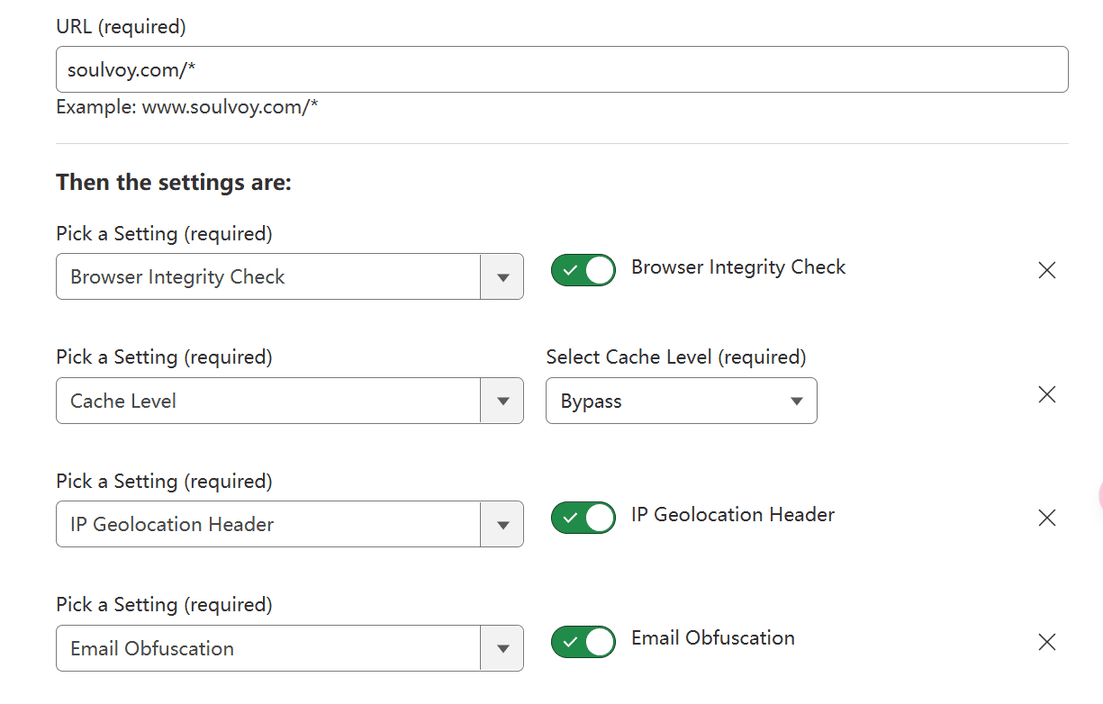
The key point is, make sure to set the cache level to “Bypass.” It’s really important—set it to “Bypass,” or else you’ll run into some serious issues!
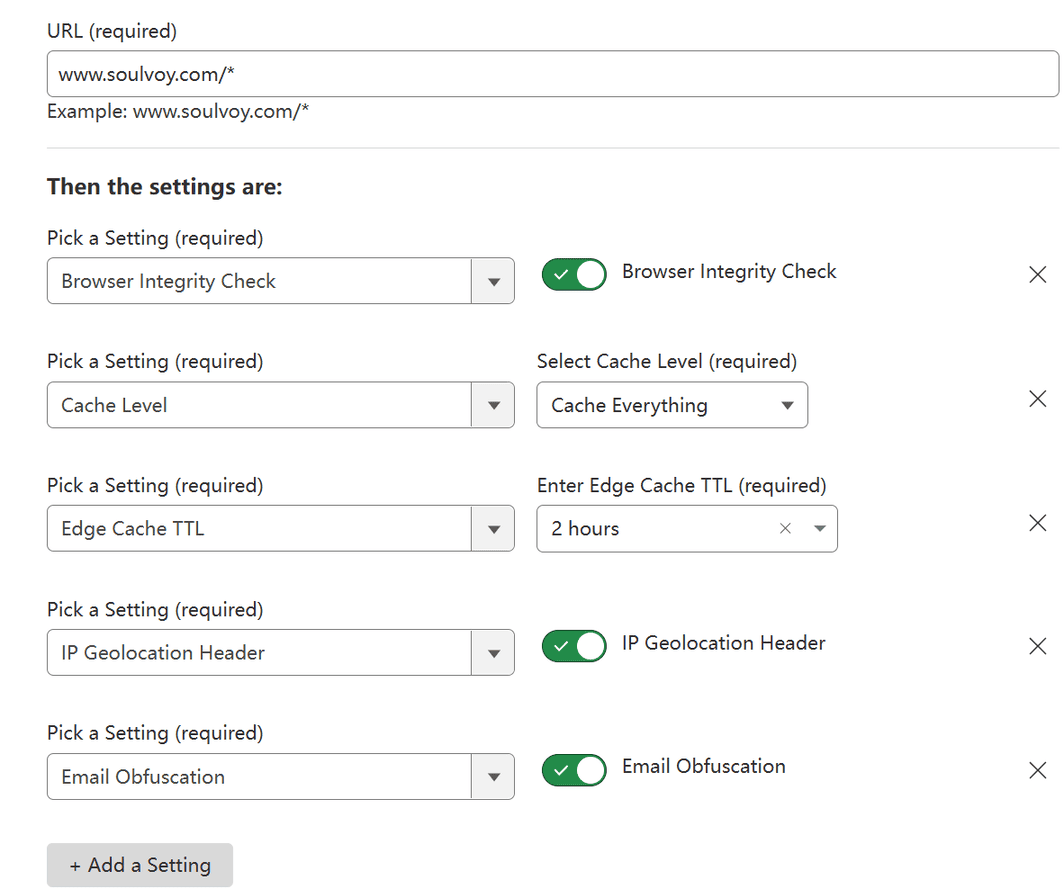
2.Set up rules for the homepage, categories, pages, and posts.
| Rule Name | value |
|---|---|
| URL | https://www.soulvoy.com/* ,Note: This URL should be changed to your own. |
| Browser Integrity Check | Open |
| Cache Level | Cache everything |
| Edge Cache TTL | 2 hours. This means the CDN will pull updates from the origin server every 2 hours. The free plan allows a minimum of 2 hours, which is usually sufficient. |
| Browser Cache TTL | This is the time the visitor’s browser caches the page. The default is 30 minutes, but it can be set as low as 2 minutes. |
| IP Geolocation Header | Open |
| Email Obfuscation | Open |
As shown below:
3. Set other dynamic page rules
For example, comments, searches, etc.
| Rule Name | value |
|---|---|
| URL | https://www.soulvoy.com/*php* ,Note: This URL should be changed to your own. |
| Browser Integrity Check | Open |
| SSL | strict |
| Cache Level | Bypass |
| IP Geolocation Header | Open |
| Email Obfuscation | Open |
As shown below:
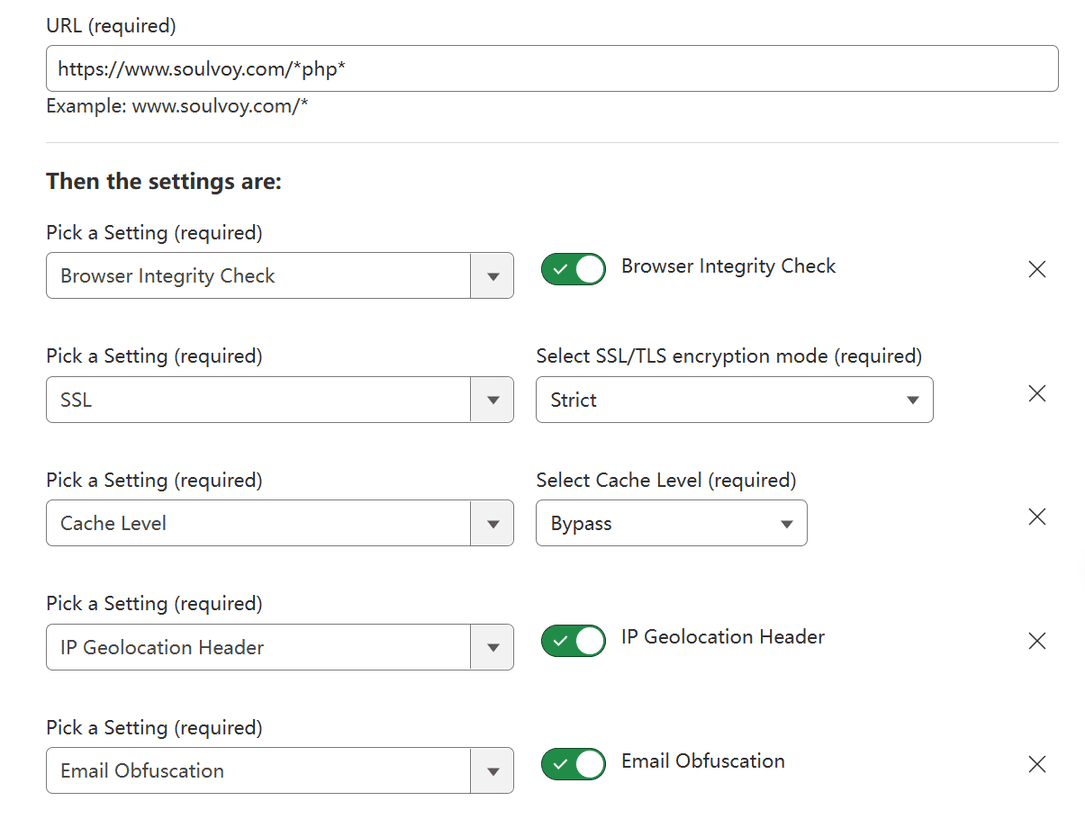
The key point is that the cache level must be set to “Bypass,” but getting it wrong here isn’t as serious as with the admin dashboard rule.
Now that we’ve set up the basic page rules for the website, we can ensure that the homepage, categories, posts, and other pages are served via the CDN. Here’s a little trick: after setting everything up, visit your website and click through all the pages to trigger caching to the CDN. That way, when real visitors browse the site, it will load instantly!
Setting up Cache Rules
Since the Cloudflare free plan allows only 3 page rules, we’ve used them up after setting 1 static page and 2 dynamic page rules. However, aside from these pages, there are many static resources on the website, such as images, JS, CSS, fonts, etc. If these are loaded from the origin server every time, it can still consume a lot of bandwidth. This is where Cache Rules come in.
The Cloudflare free plan allows you to create up to 10 cache rules per domain, which is more than enough! Now, let’s add those static resources to the cache.
Step 1: From the Cloudflare homepage, select your domain to go to the domain settings page.
Step 2: Expand the left-hand menu, click on “Caching” — then select “Cache Rules” to access the cache rule settings page.
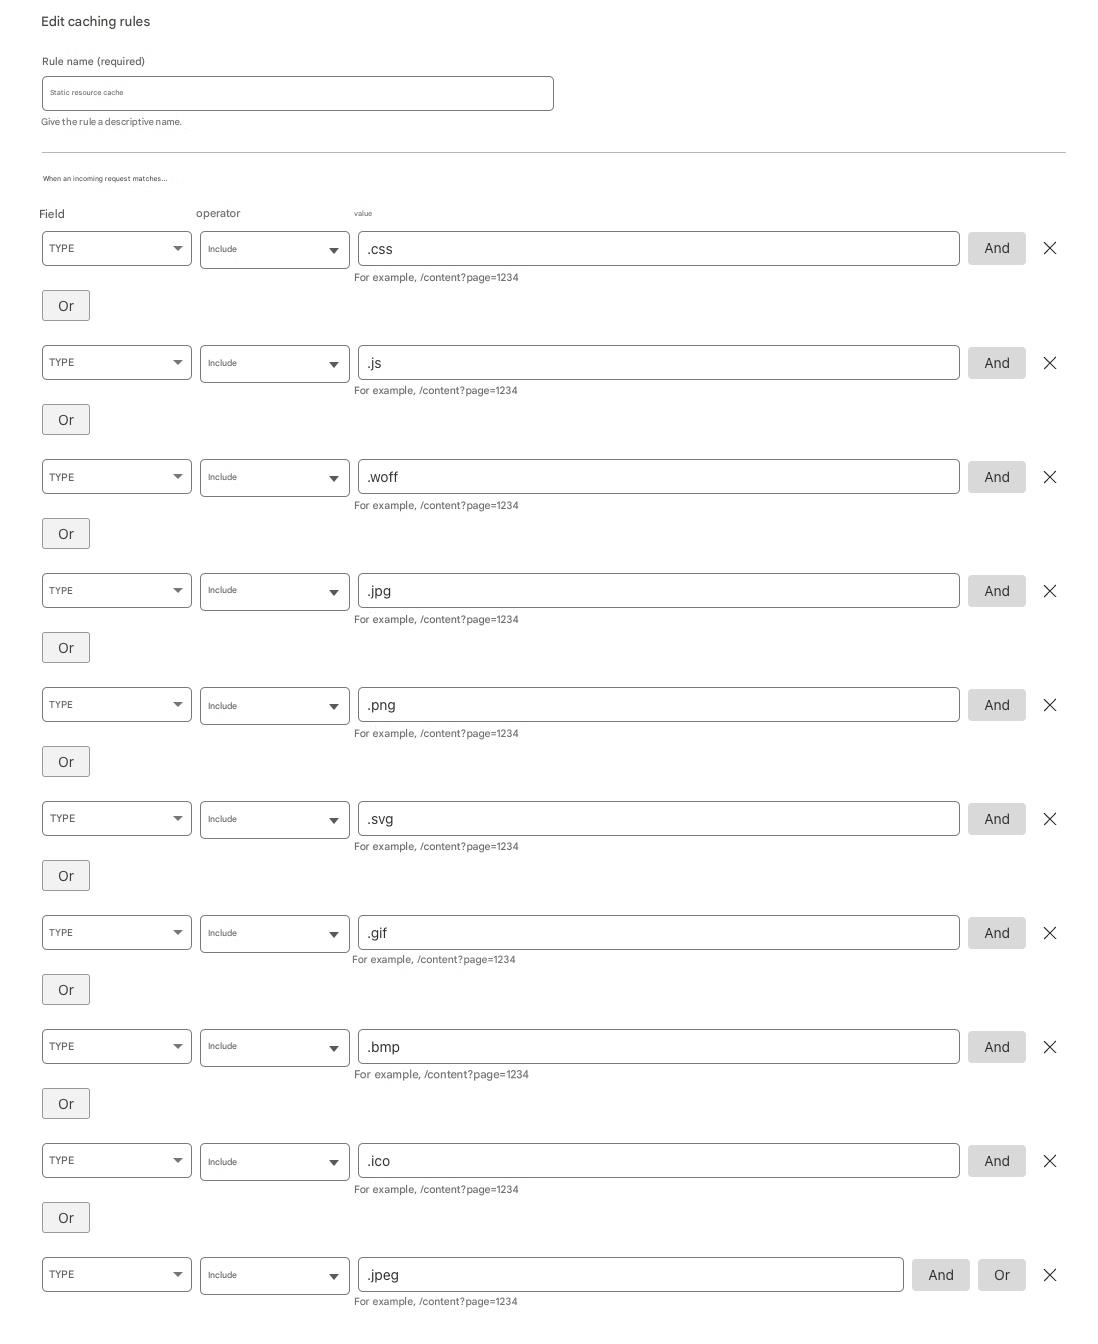
Step 3: Click the “Create Rule” button to add a rule, like this:
Method 1: You can add multiple “Or” fields on the interface, meaning that it will apply if any one of them is met.
Method 2: Since there are many types of static resources, you can also directly click “Edit Expression” and paste the content below.
(http.request.uri contains ".css") or (http.request.uri contains ".js") or (http.request.uri contains ".woff") or (http.request.uri contains ".jpg") or (http.request.uri contains ".png") or (http.request.uri contains ".svg") or (http.request.uri contains ".gif") or (http.request.uri contains ".bmp") or (http.request.uri contains ".ico") or (http.request.uri contains ".jpeg")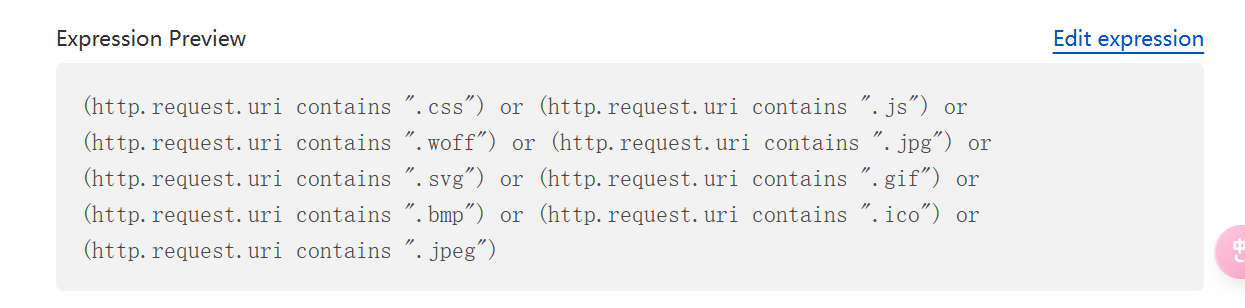
Now that we’ve set up the static resource caching rules, they won’t take effect immediately. Instead, they will gradually be cached to the CDN as your website is accessed. Here’s a small trick that works for both page rules and cache rules: After completing the setup, visit your website and click through all the pages. This will trigger the page cache to be stored in the CDN. When real visitors access the site later, the static resources will load instantly!
Other Settings
In addition to setting up page rules and cache rules, we can also make full use of Cloudflare’s other features. Here are a few that I recommend enabling:
-
Crawler Hints
When content on a site using Cloudflare is updated, Crawler Hints provides high-quality data to search engines and other crawlers. This helps crawlers fetch data more precisely, avoiding unnecessary requests and reducing the strain on your origin server and other internet infrastructure. How to enable: Cache → Configuration → Crawler Hints
-
Always Online™
This feature allows visitors to still access your site even if your origin server is down. Cloudflare can provide a limited copy of your web pages from the Internet Archive’s Wayback Machine. How to enable: Cache → Configuration → Always Online™
-
Tiered Cache Topology
By selecting a cache topology, you can control how your origin server connects with Cloudflare’s data centers, ensuring higher cache hit rates, fewer connections to the origin server, and lower internet latency. How to enable: Cache → Tiered Cache → Tiered Cache Topology™, then select “Smart Tiered Caching Topology”
Clear Cache
Finally, if you’ve changed your website’s theme, installed new plugins, or modified any code, it’s strongly recommended that you immediately clear the Cloudflare CDN cache. Otherwise, your site might not display properly, or various errors could occur.
How to clear the cache: Cache → Configuration. At the top, you’ll find the option to clear the cache. You can clear specific paths or all content, depending on your needs.
